The biggest challenge when running your own web / email server is stopping any emails you send from being classified as spam. If your emails end up being classified as spam there is good chance you will affect your end user engagement as many of the main email services such as Outlook.com and Gmail have very strict spam scoring policies that are likely to see any emails from your sites buried in their junk or spam folders.
In this guide we take a look at what you can do to help prevent your emails being classified as spam.
Introduction
The first thing to be very clear on is that email spam classification is not an exact science and is a constantly moving target. Even if you follow every inch of this guide, there is still a chance that your email will end up in someone’s junk or spam folder but at least you’ll know you’re doing everything possible to avoid it.
Before we begin, this is the hosted setup we’re basing this guide on:
- Windows 2003 R2 running IIS7.5 with IP address 200.200.200.10
- PHP 5.4
- hMailServer
- 3 hosted domains
- domain1.com
- domain2.com
- domain3.com
There are a number of other guides out there that cover similar topics for Linux so we thought we’d approach from a different angle.
We will make the assumption that all of the websites are running and that you’re using a default install for all the products mentioned.
The guide will cover the following areas:
- Creating a PTR Record for your SMTP Server
- Configuring PHP for Multiple Domains
- Creating an SPF Framework
- Creating a DKIM Signature
- Testing Sender, SPF and DKIM
- Conclusion
Creating a PTR Record for your SMTP Server
Possibly the biggest step you can take to not having your emails classed as spam is to create a PTR record that points back at your mail server. This ensures that any SMTP servers your server communicates with will take the conversation seriously and not immediately black list you.
A PTR record in simple terms is the opposite of a DNS record. A normal DNS record converts a human readable name into an IP address.
For example. If you had a server with an IP address of 200.200.200.10 and you wanted to host a website from www.domain1.com you would have to create an A host record so that when someone types www.domain1.com into their browser, DNS would translate the name into 200.200.200.10 and communicate with the right server.
A PTR record is a public way of doing the reverse. This means that if you create a PTR for 200.200.200.10 and name it mail.domain1.com – when your email server communicates with another SMTP server it will reveal it’s IP address and the remote server will be able to determine that the server talking to it is mail.domain1.com
One of the main challenges when hosting multiple domains on one server is that if you only have one IP address, you can only have a single PTR record. The smart thing to do here is have a domain setup that you want to use only for email and point everything else at it.
Unfortunately, unlike DNS – the creation of PTR records are generally more complicated to create and often you will need the assistance of your hosting provider to get one in place.
In our example, we will get a PTR record created for 200.200.200.10 and set it to mail.domain1.com
Configuring PHP for Multiple Domains
There are a number of differences when running PHP in Windows. One of the main ones is that by default, you require an address stating for the default Sendmail FROM header. This will mean that regardless of what email address your website is configured to use (for example in PHPBB or WordPress) it will still include this email address as the SMTP sending account and as you will see, this causes a big problem.
In our example, we have 3 domains.
- domain1.com
- domain2.com
- domain3.com
We have already picked domain1.com out to handle SMTP email for us and have had the PTR record created.
Let’s assume we run PHPBB3 as a forum site on domain2.com and we run WordPress on domain3.com
We have setup the following email addresses and have configured each site to use them as the main email address:
- forum@domain2.com
- blog@domain3.com
A new user registers on PHPBB3 (bob112233@gmail.com) and because we have enabled email verification as part of the user registration process, an email is sent to bob112233@gmail.com from your forum software which uses forum@domain3.com as it’s sending address.
Simple right? Well no, not really.
Because PHP on Windows has to be configured with a default FROM header address, the email is actually broken as it leaves. The FROM address is set to forum@domain2.com but the SMTP from address is postmaster@domain1.com. When this reaches Gmail (or any other well configured email platform), the receiving SMTP server get’s a little concerned as the email is showing a difference in addressing. The server may not score you down for this, but at the same time – it’s very unlikely to score you up either meaning you’re email is very likely to be considered spam.
What we have to do, is tell PHP that we’re using a number of domains and we would like it to use different SMTP from addresses depending where the request comes from. Luckily, this is very straight forward.
The next step is to ensure that your PHP environment is setup correctly so that when one of your websites uses the sendmail() function it will set the correct FROM header.
When we have a single domain, PHP can be setup by editing the php.ini file as follows to state the default sendmail_from address.
[code]
; For Win32 only.
; http://php.net/sendmail-from
sendmail_from = postmaster@domain1.com
[/code]
For each domain you are hosting on IIS / Windows, you can specify local parameters by adding the following lines to your php.ini file:
[code]
[PATH=C:/inetpub/domain2.com/]
sendmail_from = forum@domain2.com
[PATH=C:/inetpub/domain2.com/]
sendmail_from = blog@domain3.com
[/code]
You have now made PHP smart enough to work out which website is sending the email and swap the sendmail_from address accordingly.
So now if we run through our example again, when the forum sends a user registration email to bob112233@gmail.com the headers are all in agreement that although the email came from mail.domain1.com – it was definately sent from forum@domain2.com
So we’re done right? Unfortunately not. Because now Gmail is looking to see who the registered email server is for domain2.com and considering the email has come from domain1.com – guess what, that’s right – you’re slipping down the trust-o-meter again.
So now we have to find a way to convince Gmail that it’s ok for domain1.com to handle domain2.com’s email. This is where SPF and DKIM come in.
Creating an SPF Framework
As you’ll now be working out, working with email servers and Spam detection is all about trust. What you’ve got to be able to do is set yourself above Spammers and be able to create trusted links between your domains to show that your email is coming from a credible source.
Before we get into Sender Policy Framework (SPF), we first need to make sure that our DNS records are setup correctly.
So far, we’ve got the following:
- domain1.com
- mail.domain1.com (A)
- 200.200.200.10 > mail.domain1.com (PTR)
- domain2.com
- www.domain2.com (A)
- domain3.com
- www.domain3.com (A)
We now need to make sure that MX records are in place and working.
An MX record essentially states to the world which server(s) your domain uses for email delivery. When someone writes an email to hello@domain1.com, the minute it hit’s their SMTP server for delivery – the server will do a DNS lookup to find out where email for domain1.com is delivered.
Because we can only create a single PTR record per IP address, we need to firstly setup the MX record for domain1.com and point it to mail.domain1.com. There are some other interesting settings when setting up MX records including the priority. In simple terms the priority is basically telling the world in which order to try mail servers (lowest first) – in our case, we’ve only got a single server so we will use a standard cost of 10.
What we do next is create MX records for domain2 and domain3 – but here’s the twist. Because we only have one PTR record, we point both MX records at mail.domain1.com also.
This will mean that whenever a lookup is made against an email from domain2.com or domain3.com – DNS will confirm that they both use mail.domain1.com as their MX record. If/when a reverse DNS lookup is then carried out, the PTR record will confirm that the IP address being used (200.200.200.10) is indeed mail.domain1.com and along with having the correct SMTP FROM addresses in use from an earlier step, we’re well on our way to being taken seriously.
There is one small problem however – if it was this easy, why wouldn’t the world of Spam just update their DNS records to show that they use the MX record of mail.domain1.com.
This is where SPF comes in.
SPF is a huge topic with many avenues to read about. The Open SPF covers all things SPF and matched with the Microsoft SPF Wizard you will be well on your way to setting up a fantastically complex and bullet proof configuration. However, I’m pretty sure you’ll be glad to know that we’ve taken the hard work out of it for our example at least.
Essentially there are two components to SPF in this case. We create a main SPF record on domain1.com so that any receiving email server knows which servers are authorised to send mail for them and then point domain2.com and domain3.com at the same address. Effectively meaning that if email from domain1.com, domain2.com and domain3.com originates from the servers you’ve specified – the trust starts going up.
The SPF record is a TXT entry on each domain and without boring you too much with syntax, should look like the following:
- domain1.com
- host = @
- v=spf1 mx -all
- v=spf1 [confirms which version of SPF is in use, in this case version 1]
- mx [confirms that any valid mx record for domain1.com can be trusted (mail.domain1.com)]
- -all [if no rules are matched, fail the connection]
- v=spf1 mx -all
- host = @
- domain2.com
- host = @
- v=spf1 include:domain1.com -all
- v=spf1 [confirms which version of SPF is in use, in this case version 1]
- include:domain1.com [read the _spf record for domain1.com and use the same config]
- -all [if no rules are matched, fail the connection]
- v=spf1 include:domain1.com -all
- host = @
- domain3.com
- host = @
- v=spf1 include:domain1.com -all
- v=spf1 [confirms which version of SPF is in use, in this case version 1]
- include:domain1.com [read the _spf record for domain1.com and use the same config]
- -all [if no rules are matched, fail the connection]
- v=spf1 include:domain1.com -all
- host = @
Although there are lots of other things you can do with SPF, this should suffice for our example.
So to recap using our example of bob112233@gmail.com and his forum registration…
When the forum sends a user registration email to bob112233@gmail.com the headers are all in agreement that although the email came from mail.domain1.com – it was definitely sent from forum@domain2.com. Gmail will then move onto the SPF check and will confirm that the SPF for domain2.com uses the same configuration as domain1.com and the correct server has been used to send the email.
Right now, not only is Gmail starting to take your email seriously – but it’s considering inviting you round for a few beers. To help move the beer invite along a little further, we can now really push the relationship and introduce DKIM.
Creating a DKIM Signature
If SPF is the cake, then DKIM is the icing. DKIM or DomainKeys Identified Mail is again a pretty complex subject but Wikipedia has you covered with an outline of DKIM.
What we’re doing here is adding yet another marker to your email / domain / SMTP server relationship to help remote servers better trust your email. DKIM in it’s simplest terms uses a combination of Public / Private key infrastructure to validate an email has been sent from the correct server. The Public Key element is managed using DNS just like SPF, but the Private Key element is managed on your email server.
For this example, we’re using the excellent hMailServer for Windows and it fully supports DKIM.
To get started, we need to generate a Public and Private key pair.
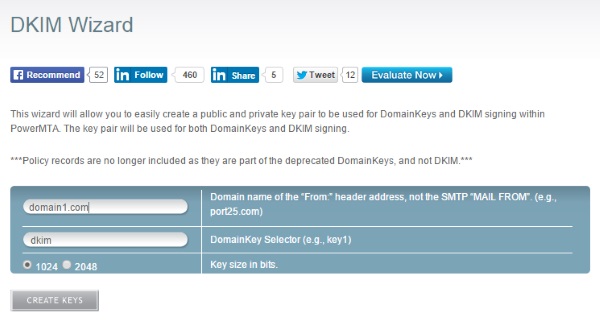
There are a number of sites that will do this for you, but we recommend Port25.com’s DKIM Wizard.
For our example, we would fill out the form as follows:

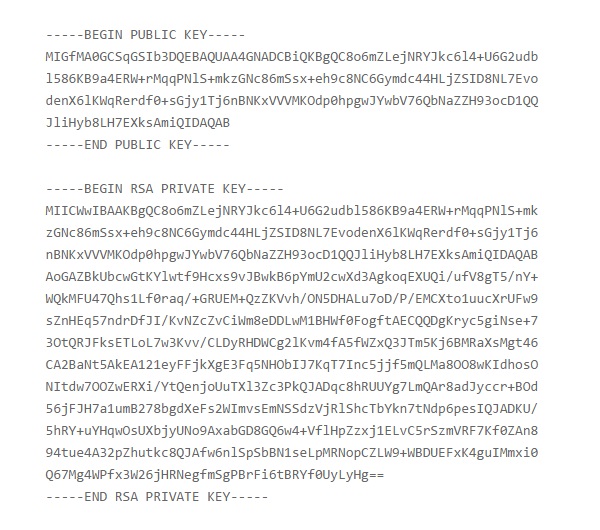
Once you click Create Keys the site will then generate you the Public and Private key pair, which will look something like this:

The next step is to create a DNS entries for the Public Key on domain1.com as follows:
[code]
_domainkey.domain1.com
k=rsa\; p=MIGfMA0GCSqGSIb3DQEBAQUAA4GNADCBiQKBgQC8o6mZLejNRYJkc6l4+U6G2udbl586KB9a4ERW+rMqqPNlS+mkzGNc86mSsx+eh9c8NC6Gymdc44HLjZSID8NL7EvodenX6lKWqRerdf0+sGjy1Tj6nBNKxVVVMKOdp0hpgwJYwbV76QbNaZZH93ocD1QQJliHyb8LH7EXksAmiQIDAQAB
dkim._domainkey.domain1.com
k=rsa\; p=MIGfMA0GCSqGSIb3DQEBAQUAA4GNADCBiQKBgQC8o6mZLejNRYJkc6l4+U6G2udbl586KB9a4ERW+rMqqPNlS+mkzGNc86mSsx+eh9c8NC6Gymdc44HLjZSID8NL7EvodenX6lKWqRerdf0+sGjy1Tj6nBNKxVVVMKOdp0hpgwJYwbV76QbNaZZH93ocD1QQJliHyb8LH7EXksAmiQIDAQAB
[/code]
Once the DKIM DNS records are in place, we need to configure hMailServer to attach the key.
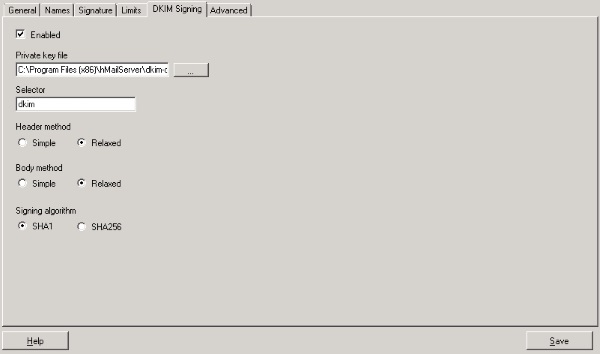
Create a new text file in the hMailServer folder, name it dkim-domain1-com.key and paste the contents of the private key including the —–BEGIN RSA PRIVATE KEY—– and —–END RSA PRIVATE KEY—– lines.
Open up the hMailServer administration tool and go to domain1.com > DKIM Signing. Browse for the file you’ve just created and the screen should look like this:

Click Save and repeat the procedure for domain2.com and domain3.com remembering to complete the Port25.com form for each one and create new DNS records and local Private key files for each.
Once all three domains are setup, you should now have DKIM configured and running.
So as a final recap….
Gmail is still considering inviting you around for a beer following your boost in trust from using both the correct SMTP send address and a newly configured SPF Framework and then, in it’s moment of weakness you present a Public / Private key exchange that confirms you are exactly who you said you were and the gates open – welcome to the party.
Now all we need to do is test that it’s all working as expected.
Testing Sender, SPF and DKIM
The easiest way to test this is to send an email from your addresses (forum@domain2.com / blog@domain3.com) to an automated checking address that will reply to you with a report of what it can see.
For this we obviously need to create some kind of test script considering these email addresses were only created for use with your forum and blog websites.
To create a test email script, do the following:
- Create a root level folder in both the c:\inetpub\domain2.com and c:\inetpub\domain3.com folders called mailtest.
- Create a file inside the mailtest folder named index.php and paste in the following code, obviously replacing domain2.com with your domain name
[code]
<?php
ini_set( ‘display_errors’, 1 );
error_reporting( E_ALL );
$from = “forum@domain2.com”;
$to = “check-auth@verifier.port25.com.”;
$subject = “ePINIONATED – Making Sure Your Email is Working”;
$message = “Lets see if all your hard work paid off and made your email work properly.”;
$headers = “From:” . $from;
mail($to,$subject,$message, $headers);
echo “Test email sent”;
?>
[/code]
Make sure you have some way of receiving any email sent to forum@domain2.com as the Port25.com tester will reply to your email address with the results.
To trigger the email test, visit http://www.domain1.com/mailtest and you should get something an email as a reply. To make sure it’s working, look for the following lines:
[code]
==========================================================
Summary of Results
==========================================================
SPF check: pass
DomainKeys check: neutral
DKIM check: pass
Sender-ID check: pass
SpamAssassin check: ham
[/code]
Don’t worry about the DomainKeys line, that’s actually something different to DKIM that we’re not concerned about.
Conclusion
Hopefully you’ve followed this guide and are now the proud owner of a very highly regarded email server. Now comes the kick in the pants. If you get all of this 100% accurate and get perfect test results – your email could still be classed as Spam.
So many contributing factors go into deciding whether email is classed as Spam or not and as stated previously, the goal posts are always moving. Factors such as the IP address you’re using and what it’s history is like, whether your email server has allowed open relay in the past, the content of your message from both the actual words used to grammar or known Spam keywords down to the actual coded construction of the message can all affect trust and ratings.
It’s a tough world out there for email Spam but think of it this way – these same hard rules apply to those trying to fill your inbox with junk too.
We hope you’ve enjoyed reading this guide as much as we have putting it together for you. If there is anything that you’d like further information on or if you would just like to say hi, please use the comments below.


This was a very informative article. Thank you for posting it. It helped me greatly.
Hi Joe, glad it helped.